2024


After the shoulders for the braces are cut onto the posts the posts are stood back into their holes.
Then Dan cuts the shoulders on the summer beam for the joists.
These shoulders are bigger and so he builds another jig and adds a sliding mid-style to support the router.
Now there is a flat surface for the joists to butt up against.
He fits them together and makes some final adjustments.

Our Daughter-in-law spent the beginning of the year participating in a four day race. First day 5K, then 10K, then 1/2 marathon, then full marathon. Our granddaughter awoke in the morning and happily wore one of mommy's medals while eating breakfast.


New Years Day!
We got a dusting of snow on January 3rd, then real snow started on the 6th, and by the 10th it looked like winter around here.
What a difference ten days makes!
With the first summer beam up (including braces), Dan is warm and cozy inside and almost finished with the second (and last) summer beam.


The snow is all powder. Our snow cat can't stay on top of the snow and sinks in and gets stuck.
I still find it fascinating how snow, wind, and freezing temperatures can create interesting snow sculptures.
(temps in the single digits)

Not much solar going on right now.
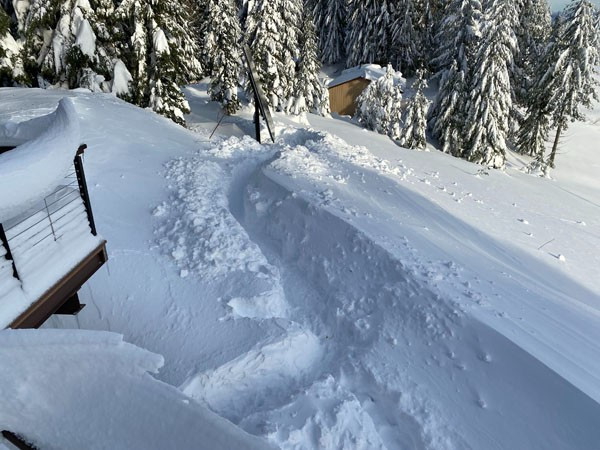
But with a break in the weather and a beauty day we dug a path to the solar panels and cleared them off.
Normally I would just stomp my way over to them, but the powder wont pack down and I had already dug a path before this last snow so it was easier to dig.
With a day of no new snow and the hardening of the snow a little we decided to attempt going down the hill. But that didn't work out to well for us. We will try again another day:)

Return to home page


Bruce started clearing the road down to the gate with his tractor and snow blower. This is a time consuming job. Dan was calling it his snow cat luge track. It looked like we would be able to get down to the gate soon.
Then mother nature threw a little freezing rain our way and iced up everything.
Hey! I didn't order frosted windows!


And it got very cold out.
Remi's tennis balls would freeze and I would thaw them by the fire.
And the trees got heavy with ice and fell, delaying the clearing of the road.


But on January 20th we made it to town...
And picked up our new little girl, Loretta. She is another rescue dog from a high kill shelter that was transported up to Vancouver. We have been unable to go get her because of the storm so a doggy foster home has been keeping her for us.


The second summer beam is put in place and the braces fitted.
The Genie lift lacks a couple of inches in height to lift the joists above the summer beam and down into the mortise. So Dan built a jig to give it the needed height.
Up goes joist #1.
After joist #5 is up completing the perimeter, joist #2 goes up.
Then joist #3 and #4 are raised. Every piece was raised and lowered serveral times in the fitting process. Thank goodness for the Genie Lift!
After Dan was happy with all the joinery, he strapped it all together and drilled the holes for the timber pegs.
Then he pounded in the pegs, trimmed the end of the pegs, and unstrapped the frame.
And there it is! Finished! Minus the staining of the pegs and a little touch up on the lacquer finish, which I will get to after things settle down with our new dog.

Next comes the building of the stairs from the basement. Dan got a partial hole opened up, and figured out the rise and run, but will need to take a couple week break for some office work.
"Hey guys, there's a hole in the floor"


Dan completed the sheeting in the stairwell, but will modify the back of the bedroom closet a little. The stairwell is big enough to build stairs to code but they will be steeper than we would like. By doing away with the upper shelf in the bedroom closet we can run the stairs in that area and add two steps making each step a little less rise.
Dan checks to make sure that the first stringer is correct then cuts three more.
With the back of the closet wall removed for now and the header relocated a skirt board was installed.
Dan had a bit of a mishap with the ladder and ruptured a bursa sac in his elbow and knocked his noggin, so he is slowed down a little.
With both skirt boards sanded, stained, and installed he is ready for the next step.
A cleat is added under the skirt boards to fully support the side stringers.
And once both side stringers are attached......
the bottom cleat is attached to the floor and the other two stringers are added.
Then it is time for risers and treads. Using a new tool (what fun is a project if you can't get a new tool), Dan sets the gauge for the board needed.
Then transfers it to a riser board.
Using a jig he made he can make a precise cut at a 5-degree bevel.
The holes in the jig allow him to see his line.
The five degree bevel gives room for the glue to be without squeeze out on the face of the stairs.
The procedure is repeated for the treads.
Several risers are installed first.
Making progress!!!


And before you know it, we're at the top!
I have applied multiple coats of finish to bring out the beauty of the wood and Dan's craftmanship.
We have carpet treads to attach after curing. It seems a shame to cover even a part of them but I think travel up and down will be loud and perhaps slippery. And with four dogs the wood will wear better and the carpet treads can be replaced.
Now the hardest part. Keeping off of them while the finish cures.

Poor Trevor! The nail gun scares him so! (Actually all loud tools). Usually he can be downstairs while we work upstairs or vise versa but work on the stairs has him running for cover.

After a little bit of a rough settle in period, Loretta is finding her spot in our doggie pack.


After the finish had cured and we added the carpet runners we let the dogs use the stairs. At first we had to coax them up and down. But it didn't take long for the to get the hang of it.
Then at the beginning of April we started the main floor framing. Mike cut boards to our stud length.
And Dan and Josh started building walls.


We started with the framing on the west side of the dome first. The three openings are: a closet on the right, a bench/storage area in the middle, and a pantry closet on the left.
We felt ten foot ceilings were a waste of space above the closets and pantry. So we made eight foot ceilings with storage areas above these areas.
Top view of the entry closets, pantry, and guest bedroom.
Building the wall between the guest bedroom and the pantry closet.


These two doorways are the bedroom entrance door and the bedroom closet door (closet not built yet).
The stair cases are between this framing and the timber frame. The stairs to the basement are complete while the stairs to the loft are hopefully coming soon.


And although Loretta was adapting to our life,
and I loved watching her curiosity and adventuristic spirit while exploring,
It just wasn't working out. While out hiking they were all great together, but in the house was a different story. As Loretta got comfortable with our home she became the alpha ruler with the girls. This was ok with Remi but not with Abby. After three months of trying to blend our dog family we decided she needed a different home. She went to live with a couple who have one submissive male dog, her size and age, who really wanted a playmate.

So we are back to three and we have harmony again. But I do miss the little troublemaker.


Next was the only full wall in the timber frame. This will be the only kitchen wall with upper cabinets.
And the opposite side is the stair well.
It is a challenge to fit the wall within the hand hewn (irregular) timber frame posts and beam.
And once the bedroom closet is framed and a few other details completed the west side framing is complete.


Time to start the framing on the east side of the dome next to the master bedroom timber frame.

It's a little different than our origanal plan because we decided to add a master 1/2 bath.
It is exciting to see these drawings come to life in actual framed walls.
The shower, 1/2 bath, and closet has eight foot ceilings with storage above like the closet areas on the west side.
On this side of the dome the storage area is all together so we framed an opening for a pull down ladder.


May 2nd we picked up our timbers from Sticks. A local sawyer who rough cut, kiln dried, and final cut timbers we had ordered.

When we get up to the framing in the loft, the timbers will be used for doorway surrounds.


We took a little trip and celebrated Mother's day and my mom's 90th birthday.
We went up over Washington pass where the elevation change caused our potato chips to open themselves (how convenient)!
And onto Winthrop to watch the 49er Days parade,
where the horses had silver hooves and sparkles on their butts!
Then onto Leavenworth for more festivities and shopping at the Kringle Store.


Then Bob brought up his laser level and he, Dan, and Mike marked laser lines around the dome for the ledger boards.
After marking for the ledger boards, they figured the angles and lengths and made the compound cuts for the ledger boards to attach to the dome with a level top.


When we got back home, Mike and Dan got busy getting the rest of the ledger boards up.
Around the west side of the dome,
And around the east side of the dome.


And so after the pull down ladder was installed,
And the rest of the storage areas were sheeted...
They started installing the loft joists.
Dan built a temporary stud wall to hold up one end of the joist. It can be moved around and supports the joist at just the right height.
All the joist that touch the dome had to be mitered to the correct angle.


The ends of the joists were left to run wild till they were all installed.
Then they were trimmed and rim joists were added.


The joists over the timber frame have to be notched to accommodate the irregularities of the hand hewn beams.
Metal plates are added to secure the joists. These add a lot of strength to the loft.
The joists took just a bit longer :) than anticipated because of the fitting to the dome and over the timber frame.
We used inch and an eighth tongue and groove plywood. It is heavy and can be a bugger to get the tongue and groove to fit snugly. And working in the loft with very little area finished is difficult. But once installed it is very solid.
Once they got a few sheets installed they had more room to work.
But once the joists were all installed and both sides trimmed and rimmed we were on to sheeting.


We took a trip to La Pine and purchased some 8 x 10 hand hewn short beams to make posts for the loft railings. They don't look like much now, but they will look good when they are cleaned and finished.
We also visited a hardwood mill and purchased these Black Walnut boards to make stair treads out of. We decided not to use a softwood for the main stairs in hope that these will wear better.

With the Suburban in its restoration process, we had to use my car to haul plywood. Good thing it thinks it's a truck.


We added a fenced area. It is combination dog yard/ garden area. Hopefully high enough to keep a small garden protected. And since it comes off the basement door it gives the dogs an area to go outside freely when they need to be contained (like when we are gone or when Remi is being a troublemaker).
Since our house is not complete enough to host our family for a whole weekend yet, we rented a house in the Mt Hood area and had a get-a-way weekend with my mom, all our kids, and all our grandkids :) :) :)


Then we had a fun gathering at the dome with a bunch of friends!


Next is firewood. Because no firewood in the summer = no toasty fire in the winter!
Firewood in progress: Dan bucks the logs into rounds then we split it.
For the rounds that are too big for me to lift, Dan turns the splitter vertical and quarters the rounds first before we split.


The loft sheeting took ten days to complete and add 832 sq feet of floor space.
The hole in the loft is where the stairs come up. We will build the stairs and add temporary railings before we start the framing of the loft walls. But first Dan has to make the timber frame door surrounds for the loft door frames.
This side of the loft is open to the dining area below.
And this side is open to the living room below.


I love my new garden area. I will develop it a little more next year, but for now I am enjoying what I have going so far.
And although the dogs don't like it when we are gone, now they have an outside area to wait for us.
And because my garden area is also a dog yard, the critters don't seem to come in and bother my plants.
I found this cool support for my honeysuckle. The dogs have trimmed it a bit for me and I am not sure what the snow will do to it, but for now my honeysuckle is climbing.

They came from this 120 year old barn in Indian Valley, Idaho.


On the 12th of August Dan bought a tractor. It is a 2008 but only has 390 hours on it and looks like new. And he loves it!
The first thing he did with it was move all the firewood.
We filled the shed, put some in the carport, and made a big stack of the rest. We are now a year ahead which is what we wanted.
Next is the in-ground gutter or drainage ditch. We get a lot of water off the dome, especially where the extensions meet the dome. I wanted the ditch to be functional but also look good.
Dan dug a ditch and added a sloped edge wide enough to catch the rain, whether it was dripping from the roof or shooting off of it.
We poured concrete around the grade board, then after it set up a bit, we removed the board and filled in the gap. This assured us that the bottom of the ditch had slope.
Then we repeated the process, continuing with enough slope to drain away from the dome.
Once the concrete was soft set, I carved a random flagstone pattern in the bottom of the ditch.
Then I added concrete "rocks" to the sides.
While I was doing that, Dan was digging and shaping more ditch, removing lots of rocks and boulders along the way.


But the ditch was getting deep as we continued the slope away from the entry porch. So, we added a second level. First Dan laid a culvert in the ditch.
Then we added concrete to bring the bottom to the culvert, made a little backfill dam, and bedded in the culvert in so it would not move during backfilling.
Using his tractor, he backfilled over the culvert keeping the grade moving away from the dome (have I mentioned that Dan loves his new tractor).

We continue on with the new bottom.
I kept adding the sides while he kept digging. (I had the "way funner" part).
Eventually, I want to color the flagstone bottom the same colors as the concrete flagstone path next to it and color the rock sides black. Then I will add ferns to both sides of the ditch, not missing the Dandelions at all.


After finishing digging the ditch, Dan poured the second pad for the supports for the ramp that will come off the end of the deck.
Then we poured the rest of the bottom of the ditch.

The culvert exits at the top of the hill, making the ditch all one level again.


Then Dan places a large rock slab over the ditch as a bridge. (OK, I'm kind of loving the tractor too).
I will add flagstones at both ends of the bridge and bring the grade up a bit.
The section of the ditch that will be beneath the ramp is narrower because it is past the end of the building and it wont be catching rain water off the roof.

I started out calling it an in-ground gutter, then as it grew, I called it the ditch, for a while we refered to it as the moat, but now Dan calls it the Panama Canal. Whatever it is called it is full of gravity and it works.


And since this project took 12 1/2 times more than we thought it would, we did some other things also.....
Spent a beautiful day on a sternwheeler on the Columbia River brunch tour to celebrate our anniversary.
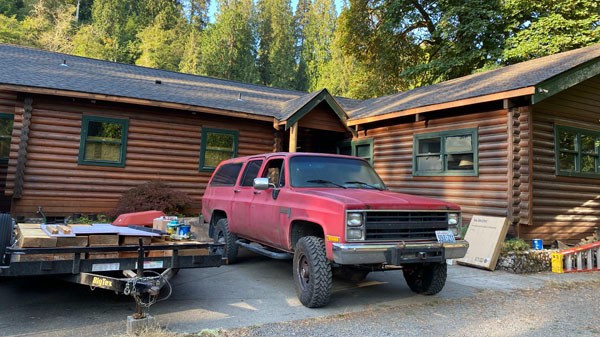
Bruce finished the restoration on the Suburban, Dan added stereo, tires, and misc. It is nice to have "The Burban" back and it is beauty!
Dan ordered some electronic rat traps, and they work great!!! But rather than show you the deceased rodents I thought I would show you some of the flowers I now have since controlling the rodent population.

Even the berries growing through the fence are being left alone.


A Toad, a Barred Owl, and a pair of juvenile Cougars were spotted.


Dan bought a backhoe attachment for the tractor.
And we took our grandson to the Dark Side of the Moon to celebrate our birthdays.
(Pink Floyd laser light show at the Kendall Planetarium)


Dan bought this '85 Suburban in the early 90's. It had been a work crummy, so it was a little rough. Then in '96 it was in the flood at our house. It was restored so it became a '85-96.
For many years, it would see us through camping, rafting, playing in the snow, big dog transportation, and more.
With its aggressive treaded tires, small lift kit to get up out of the snow, and its gears changed out to be powerful going up hills, it was our mountain truck.


In 2006 we bought the property where we live now and "the Burb" began the years long job of hauling up materials and supplies.

Dan found another Suburban for sale being stored in a barn with a blown engine and other mechanical issues but a great body.
Not really having the time to work on it, we stored it away for a couple of years.
Then last fall Bruce began the body swap and the restoration of the Burb.
The old Burb body became a pickup for a day!
But the body had begun to rust, so Dan started looking for a new body.
The '1985-'96-'24 Burb!


Then they began clearing a site by our gate where next spring we will build a pole building that will be the tractor/snowcat barn.
Lots of smaller trees and stumps.
And this old growth Douglas Fir stump that was located in the future build site.
They dug around it with the tractor as much as they could then it had to be hand dug to undermine it.
The big roots were cut, then they pulled it over with a cable, a shackle, and the dump truck.
Then they chained it up, and were able to pull it out of the hole.


It was cut in half, then each half cut in thirds, then Dan could haul it away in the tractor.
It left quite the hole that had to be filled in.


And so the filling began. There's a bank next to the build site that we wanted to cut down to make more space for the barn. So we used that dirt plus 14 dump truck loads.
We have a landing part way down the hill from our dome. Bruce cut the bank back further and loaded the dump truck with the tractor.

The building site isn't completely prepped for the barn construction yet, but we got a good head start on it for next spring.


Dan bought forks for his tractor.
He used the forks to move timbers from the shop to the house.

Where he planed and stack them. Now they are ready to add joinery to make them into doorway surrounds.
Then we started hauling up materials for projects we would like to do this winter.
We brought up lumber for the loft framing.
And Hardi board, mortar, and stone for veneering the riser walls beneath the triangle windows. We can't bring up these kind of materials in the snow cat.


For my birthday, Dan bought me this fire hydrant for the doggie yard :)

I tucked in all my bulbs for the winter.
And then Nov 18th it started snowing. We got a total of one and a half feet.


But it didn't last long. And within about a week all the snow was gone in the sunny areas. Just a little stayed in the shady spots.

Next was the doggie door/insulation project.
The plan was to insulate the wall between the hot tub / bedroom room and the wall between the hot tub / rec room. Then add a door and insulate the pump room.
Then add a door with a doggie door to the interior of the hot tub room. This allowing us to leave the exterior door open for the dogs (especially when we are gone) without freezing our living space, and still close it at night to keep the critters out.
This project has also quieted the pump noise significantly.


With still no snow, Dan brought home plywood and a Suburban load of insulation.
After some research, we decided to go with Rockwool. We had not used this before. Dan really liked the way it installed and preformed. Even before we had finished installing all of it we could hear and feel a big difference in the room.
As soon as it was insulated, Dan sheeted the walls. It is still an unfinished wall, but it is way better than open studs with plastic.


Next is the door. Dan finally gets to use his new tool, the Jam Master! He inserted it in the doorway and added the shims.
Then routed the shims using the Jamb master guides.
Then removes the Jam Master leaving shims the perfect size, width, and taper for the door.

Once the door was fitted, Dan added the doggie door and hardware. They are not too sure about it yet, but I think they will get the hang of it.


Meanwhile, I brought up a little more rock for my next project.
Then Dec 12 -18th we got a little more snow.... But again it did not stick around.


I did a little decorating for Chistmas....

We attended Christmas Eve candlelight service at Robbie's church and got to see some of our grandchildren perform in the Christmas play...
And Christmas morning it was snowing lightly so we had a white Christmas!


We spent a wonderful Christmas with four generations celebrating together.
Merry Christmas to everyone and a happy New Year! Hope everyone's year was a wonderful one with the next new adventures right around the corner!